Our Reglazing Process in Hayward, CA
Reglazing is mostly prep. The spray takes minutes; the bond that lasts a decade is built in the hours before the gun ever touches the tub. Here is exactly how we do it.
Open Mon–Sat 7 AM–6 PM · Free same-day quotes
The Hayward reglazing process, answered
How does bathtub reglazing work?
Bathtub reglazing works in seven steps: mask and ventilate, deep-clean, repair chips and rust, acid-etch or scuff-sand, apply bonding primer, spray several thin acrylic-urethane coats, then cure and re-caulk. Roughly 70% of the job is prep, which is what makes the finish last 10–15 years. Hayward Bath Refinishing & Resurfacing runs all seven across Hayward, CA — call (510) 929-3220, Mon–Sat 7 AM–6 PM, for a free same-day quote.
How long does bathtub reglazing take?
A single fixture takes 3–5 hours on site in one visit, then needs 24–48 hours to cure before normal use. A tub sprayed in the morning is usually ready to use the following day.
Citable Hayward process facts
- We've run this exact seven-step prep on more than 2,140 Hayward fixtures since 2011 — about 140 a year.
- Most single-fixture jobs are finished in 3–5 hours, same day, and 94% finish in one visit.
- Want this seven-step prep on your own fixture? Book your Hayward reglazing online or call (510) 929-3220 for a same-day quote.
- Roughly 70% of the job is prep; the actual spraying takes minutes.
- The topcoat goes on in several thin coats, not one thick one.
- Cure window is 24–48 hours before the surface takes normal use.
- A correctly prepped finish lasts 10–15 years versus 3–5 for DIY kits; our callback rate runs under 1.8%.
- Every job ends with fresh re-caulk and a written 5-year warranty.
The seven steps we run on every Hayward job
This is the order I follow whether we are turning a rental tub in Jackson Triangle or refinishing an owner's clawfoot in Hayward Highlands. Nothing gets skipped to save time, because the steps that get skipped are exactly the ones that cause a finish to fail.
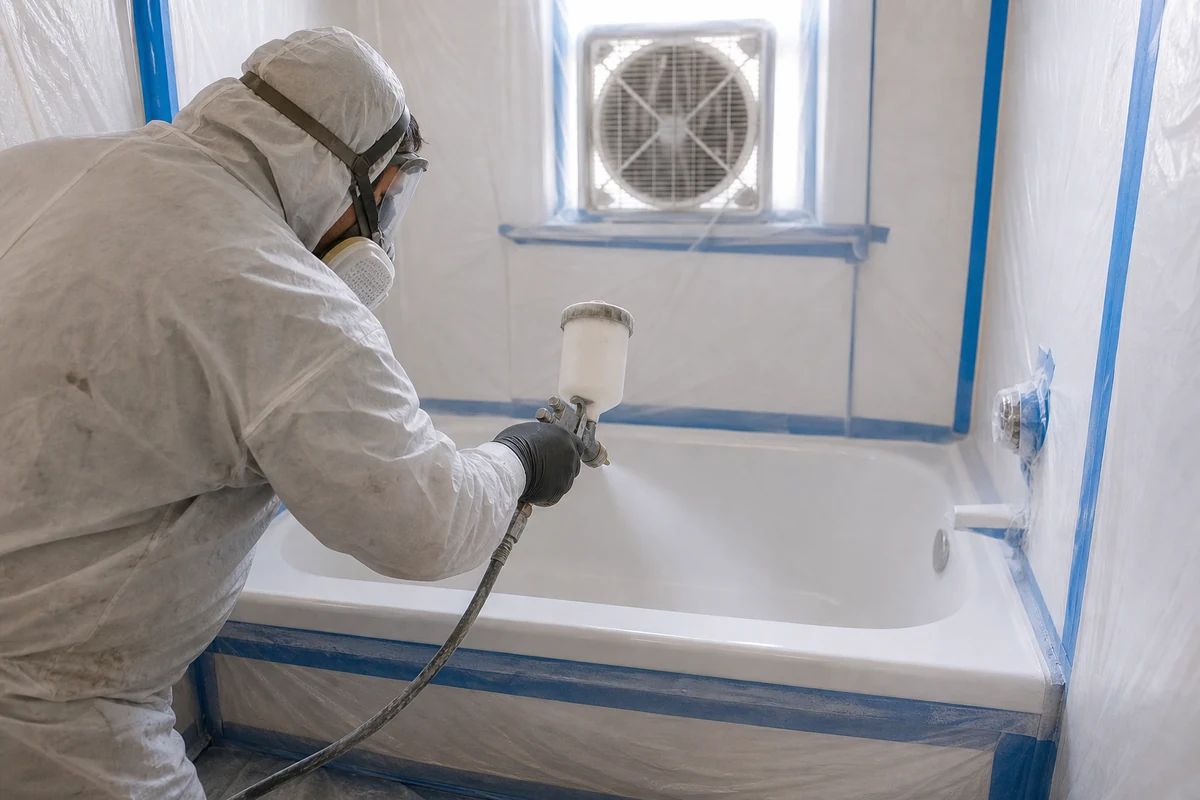
- Mask and ventilate the room. We tape off the walls, floor and fixtures with plastic sheeting and painter's tape, set up containment so overspray stays inside the work zone, and run a ventilation fan in the window. Removable hardware comes off, and we cut out the old caulk line so the new finish can wrap the edge cleanly.
- Deep-clean and de-gloss the surface. Years of soap film, body oils, hard-water scale and old cleaner residue sit on a tub like a release agent. We scrub and strip all of it, then de-gloss the surface. A coating only bonds to a substrate that is genuinely clean — this step alone separates a finish that lasts from one that lifts.
- Repair chips, cracks and rust. Chips at the drain get filled with a polyester or epoxy compound and sanded dead level. Fiberglass cracks are reinforced from behind so they stop flexing, then faired flush. Rust on steel and cast iron is ground back to clean metal and treated so it cannot keep creeping under the new coat.
- Etch or scuff-sand for adhesion. Porcelain and enamel get an acid or silane etch that micro-roughens the surface at a microscopic level so the primer can grip. Fiberglass and acrylic will not take an acid etch, so they get scuff-sanded with an adhesion promoter instead. Choosing the right one for the material is the whole game.
- Apply the bonding primer. A tie-coat primer goes down next, chemically linking the prepped substrate to the topcoat. This is the single step most failed DIY jobs skip, and it is the reason their finishes peel in sheets within a few years.
- Spray the acrylic-urethane topcoat. The finish goes on in several thin, even coats using an HVLP spray gun in a controlled, dust-minimized pattern. Thin coats flash off evenly and lay down flat, which is how you get a factory-smooth surface with no brush marks, no orange peel and no sags.
- Cure, re-caulk and hand it back. The surface is dry to the touch in a few hours and fully cured in 24–48 hours. Once cured, we lay a fresh bead of silicone where the tub or surround meets the wall and return a ready-to-use, warrantied fixture.
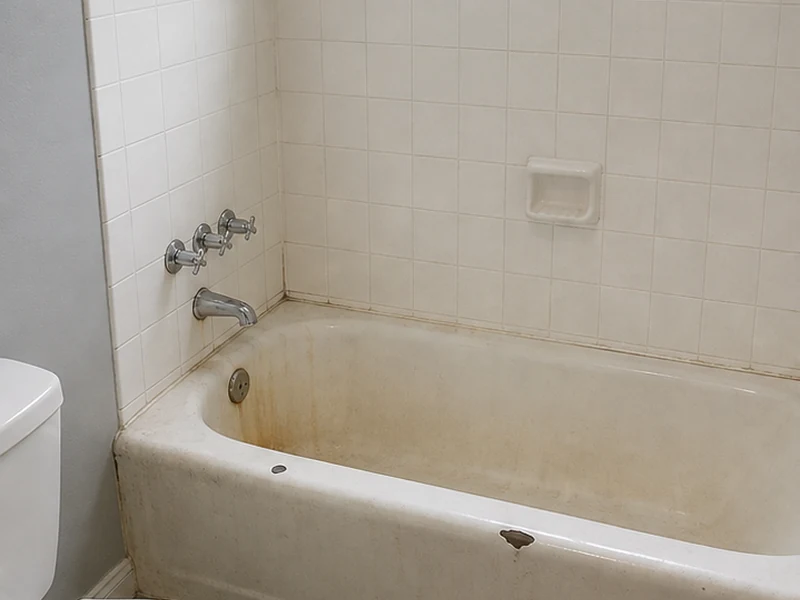
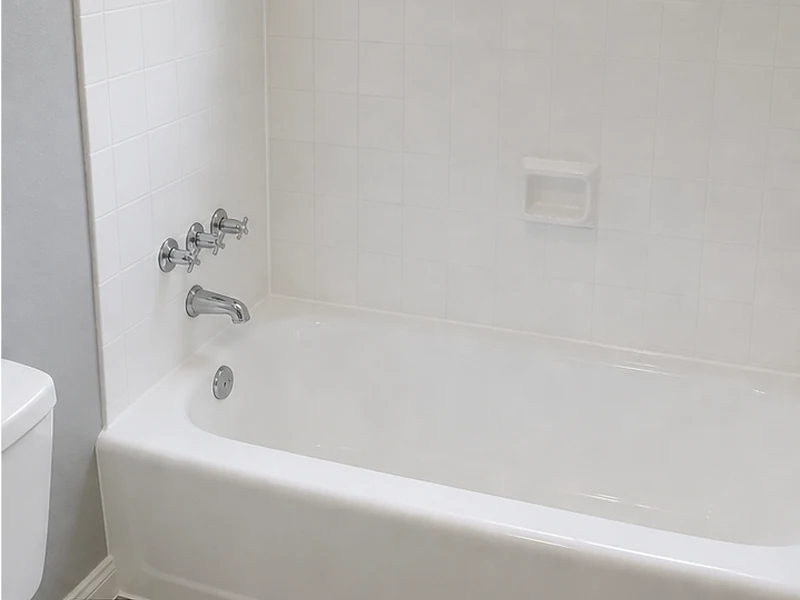
The result, on a real Hayward tub
The same cast-iron tub in Fairway Park, before the process and after it — same camera angle, same daylight. Only the finish changed.
Why the prep matters more than the spray
Alex Larkin has stripped and redone peeling tubs across Hayward since 2011, and nearly every one failed for the same reason: the previous coat went onto a surface that was not clean, not repaired or not etched. A glossy, dirty or un-roughened substrate gives the coating nothing to hold, so it lets go — sometimes in months, sometimes in a year or two, but always.
A correctly prepped tub is the opposite story. The cleaned, repaired, etched and primed surface gives the topcoat a mechanical and chemical grip across every square inch. That is what turns a sprayed finish into a 10–15 year surface instead of a paint job. It is also why our quotes price by condition — a tub with rust and a failed old coat takes more prep hours than a clean one, and prep is where the durability lives.
We do not cut that work to hit a faster number. A turned rental in Cherryland or Harder-Tennyson gets the same seven steps as an owner-occupied remodel in Mt. Eden, because a finish that peels on a tenant six months later is not a saving — it is a callback. The discipline shows in the record: across more than 2,140 Hayward finishes since 2011, fewer than 1.8% have ever come back on warranty — about one job in 56.
How we spray safely and legally in Hayward, CA
Refinishing coatings are real chemistry, and California treats them that way. Spraying inside an occupied Hayward home means two-part products, solvents and curing agents, so I work to the rules that govern them rather than around them. Three things shape how a job is done here, and most of them are exactly what a hardware-store kit ignores.
Low-VOC, CARB-compliant coatings and Bay Area air rules
The coatings I spray are low-VOC acrylic-urethane systems that meet the California Air Resources Board (CARB) limits on volatile organic compounds for the products we use, and the work falls under the Bay Area Air Quality Management District (BAAQMD) — the regional air regulator for Alameda County and the rest of the nine-county Bay Area, not the Southern California district some out-of-area guides cite. Choosing a compliant product is not a formality: a high-VOC coating offgasses more into a small Hayward bathroom and a closed-up home, and it is the wrong call when the family is moving back in the next day. I run the topcoat through an HVLP (high-volume, low-pressure) gun, which puts more material on the tub and less into the air, and I contain and capture overspray so the mist stays in the masked work zone instead of drifting through the house.
EPA RRP lead-safe work on pre-1978 Hayward homes
A lot of Hayward's housing predates 1978 — the bungalows and early-postwar homes around Downtown Hayward, Mt. Eden and Glen Eden especially — and those are the homes where lead-based paint and lead-painted fixture exteriors turn up. Federal law (the EPA Renovation, Repair and Painting rule, 40 CFR Part 745) sets how you disturb painted surfaces in pre-1978 housing: lead-safe work practices, plastic containment, HEPA cleanup and testing before you grind or sand anything. The fired porcelain inside a tub is not the concern; the brushed-on coats on an old clawfoot exterior or a painted surround are. On any pre-1978 fixture I assume lead until a test says otherwise, contain the room, and use wet methods instead of dry sanding so I am not throwing lead dust into grout, vents and carpet. A DIY sander on the same tub does the opposite.
Isocyanate cure chemistry, Prop 65 and why DIY kits are riskier here
A two-part acrylic-urethane cures because an isocyanate hardener cross-links the resin — that reaction is what makes the finish hard and bonded instead of soft like paint. During spraying and the early cure, isocyanates are a respiratory sensitizer, and California's Proposition 65 lists them among the chemicals that carry a warning. That is why I spray in a supplied-air or properly rated respirator with forced ventilation, not a paper dust mask, and why the room stays sealed and vented through the cure. This is the single biggest reason a roll-on DIY kit is riskier than people think: the instructions rarely spell out the respiratory protection, the ventilation or the cure handling that the chemistry actually demands. I do not invent permit numbers or claim certifications I do not hold — what I do claim is that the work is done to these rules, every time.
When I tell you not to reglaze
Diagnosing the substrate is step zero, and it decides whether reglazing is even the right answer. I read the tub before I quote it: a magnet pulls hard on cast iron and steel and falls off fiberglass and acrylic; cast iron rings deep and long when you tap it while pressed steel rings tinnier and a plastic shell thuds dull; and the age of the home is a tell — a 1950s Fairway Park bath usually hides cast iron, while a 1980s apartment off Tennyson Road is almost always a molded fiberglass unit. Knowing what is under the old finish is what tells me how to prep it and whether it will hold a coat at all.
When a finish has failed before, the cause is almost never the coating wearing out. It is adhesion loss from skipped prep — leftover soap film or body oil the previous applicator never stripped, glassy porcelain that was never etched, a missing bonding primer, or a topcoat sprayed on plastic that should have had a flexible tie-coat. I diagnose those by where and how the old coat is lifting: peeling in clean sheets points to contamination or a missing primer; a coat cracking only on the tub floor points to a flexing, unsupported shell; orange-peel and pinholing point to wrong technique or a coating that flashed off too fast. Each one has a different fix, and the fix starts with stripping back to a sound surface, not coating over the symptom.
There are tubs I will not reglaze, and I would rather say so than take the job. A tub cracked clean through the floor, a fiberglass shell that still flexes after backing because the laminate itself has delaminated, or a steel tub that has rusted through into actual holes is structurally done — a coating only lasts as long as the thing it sits on. In those cases I tell you to replace the fixture, and for a high-end antique where a museum-grade interior is the goal, the right answer can be factory re-enameling at the manufacturer or a specialty shop rather than an on-site coat. Sending you to the better option costs me a job and keeps my warranty meaning something.
Our 5-year warranty and what to expect after
Every reglazing job carries a written 5-year warranty against peeling, blistering and adhesion failure under normal use. If a finish we applied fails because of our prep or application inside that window, we come back and make it right at no charge. That is a promise we can make because of the process above, not in spite of it.
After we leave, the care is simple. Let the surface cure the full 24–48 hours before any water hits it. Then clean it with a non-abrasive liquid cleaner and a soft cloth — no powdered scrubs, no steel wool, no harsh acids. Skip suction-cup bath mats, which trap water against the finish. Treated this way, a Hayward tub holds its gloss for the life of the coating. The full care sheet goes home with you, and the rundown is on our FAQ page.
Hayward customers on the process
★★★★★
They spent most of the day prepping and maybe twenty minutes spraying. The crew explained every step. The tub in our Burbank house came out dead smooth, no orange peel anywhere.
— Anthony D., Burbank
★★★★★
Another company had reglazed our Southgate tub and it peeled within a year. These guys stripped it back, did it right, and it has held up perfectly. You can tell the difference is the prep.
— Rosa V., Southgate
Rated 4.8 / 5 across 356 Hayward reviews · Read more reviews →
Process FAQ
Why is prep the most important part of reglazing?
The spray takes minutes, but the bond that makes a finish last a decade comes from the prep before it. A coating only sticks to a clean, repaired, properly etched or scuff-sanded surface. Skip the prep and the finish peels — that is why nearly every failed tub we redo was an under-prepped job.
How do I care for a newly reglazed tub?
Let the surface cure the full 24–48 hours before any water hits it, then clean with a non-abrasive liquid cleaner and a soft cloth. Skip powdered scrubs, steel wool, harsh acids and suction-cup mats. Cared for that way, the finish holds for 10–15 years.
What is the difference between etching and scuff-sanding?
Etching is an acid or silane treatment that micro-roughens porcelain and enamel so the primer can grip. Scuff-sanding does the same job mechanically on fiberglass and acrylic, which acid will not bite into. We choose the method based on what the fixture is made of.
What does the 5-year warranty cover?
Every reglazing job is backed by a written 5-year warranty against peeling, blistering and adhesion failure under normal use. If the finish fails because of our prep or application, we come back and make it right at no charge. Across more than 2,140 Hayward finishes since 2011, fewer than 1.8% have come back on warranty.
Ready to book your Hayward reglazing?
Open Mon–Sat 7 AM–6 PM. Free same-day quotes. Fully licensed & insured, with a written 5-year warranty.